Today’s post is kind of like a public service announcement: Make your own yogurt. Honestly, I can’t believe it took me this long to start making yogurt at home. For some reason I was under the impression that it was more complicated. I don’t know if I thought it required fancy equipment, took up too much refrigerator space, or what. Turns out it’s only two little ingredients and a very simple process. And given the amount of yogurt we eat, this discovery ended up being a game changer.
Here’s a little insight into our yogurt-centric family. My kids and husband eat yogurt every single day. I certainly like it, but the other three are nuts. So until this homemade-yogurt discovery, week after week I ended up buying loads of the stuff. I always sought out the organic versions, but even they were often packed with unnecessary, processed sugar. That always troubled me a bit. And the cost of keeping my family's yogurt supply stocked was embarrassing. The good stuff is not cheap.

So far, I’ve been making plain yogurt. It’s more versatile, and I like to use it in preparing other meals, too. We make Indian food frequently, so it works perfectly swirled into various dishes. I’ve also been putting it into different egg-salad recipes, making salad dressings from it, baking with it, and once summer hits, I can’t wait to make frozen yogurt-pops for the kids. It’s been so convenient to have such a large supply on hand every week.
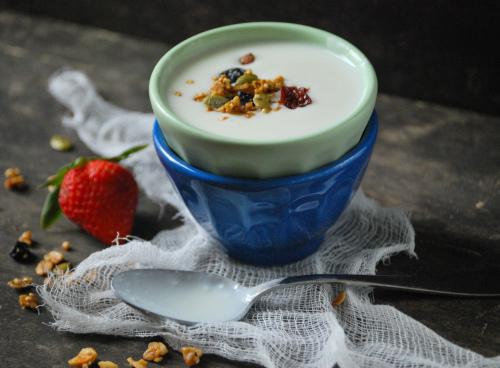
This homemade yogurt is creamy and not overly tart. I imagine that part of the flavor will depend upon the milk that you use. I’ve made several batches using milk with different fat contents, and I’ve mixed both regular and Greek yogurt into the heated milk. They’ve all worked well. If you prefer a thicker yogurt, you’ll want to strain it in a few layers of cheesecloth when it’s finished. I might do that in the future, but right now I want to enjoy every last spoonful. My husband and I have been enjoying it plain with homemade granola, while the kids like it sweetened with a touch of honey. I’ve also pureed fruit and stirred it in, and can’t wait until berry season arrives. The process could not be simpler. Once I put the yogurt in the oven, I don’t give it another thought until the morning.
 A few other things to consider: When you make your own yogurt, you know exactly what’s going into it. We buy milk from grass-fed cows from a local dairy. Aside from having more control over our food supply chain by buying local, the grass-fed milk contains more omega 3s (among other health benefits). I also love that I can keep my family’s yogurt habit satisfied at a fraction of the cost of buying those individual packages. And without those individual plastic packages, there’s less waste. Alright, enough preaching for now. Go make a batch!
The Recipe: Homemade Yogurt
1/2 gallon milk, preferably organic (you choose the fat content)
1/2 cup plain yogurt with active live cultures, preferably organic
Candy thermometer
In a large saucepan heat the milk to 170°F, stirring every so often. This will kill anything that isn’t supposed to be there. Let the milk cool to 110°F. This process will take about an hour, stir occasionally to release steam. In the meantime, heat your oven to the lowest setting. Once the milk reaches 110°F, stir a bit of the warm milk into the 1/2 cup of plain yogurt to temper it, then add the entire yogurt mixture to the saucepan and mix everything together.
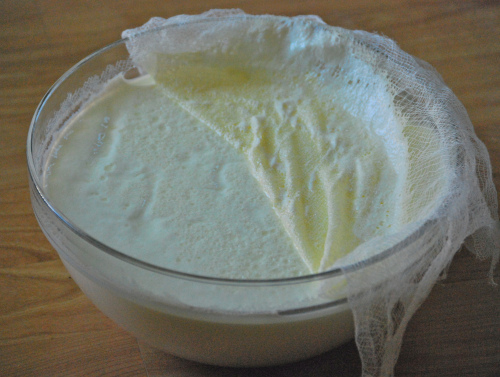 Pour the mixture into a large glass bowl and lightly press cheesecloth onto the liquid. This will prevent a “skin” from forming on the yogurt. Put the bowl on a baking sheet and place in the oven. Turn the oven off and turn on the oven light. This will generate enough heat in the oven for the yogurt to stay active. You want to try to maintain an oven temperature of about 110°F. After about 12 hours in the oven, the yogurt is done.
Experiment with the duration of time — you may prefer it with a shorter time in the oven. Remove the cheesecloth and give it a stir. Pour it into individual glass bowls or just leave it in the bowl, cover it, and refrigerate.
The yogurt will keep well for about 10 days, but it will more than likely be gone before then!
Source: Adapted from Zoe Bakes
 Laurie Jesch-Kulseth is a lifelong home cook who has always believed that eating healthy food is an important part of a balanced life. A wife and mother of two, she pours her heart into the meals she makes for her family. She photographs and writes about it all on her blog, Relishing It, where a version of this story first appeared.